The third block of the year is when you are going to start turning all of those variations and volumes into some tangible progress you can see on the bar, in the form of more weight. Block 3 still follows an undulating week to week plan with week’s 1 and 3 being more about total volume over the week using larger ROM lifts and high session volume loads to create a lot of muscular work. This is juxtaposed with weeks 2 and 4 which have a higher frequency in terms of over the week but represent a higher average intensity and lower volume. The use of more competition specific set ups also reduces the load this increases the overall intensity of the weeks.
Block 3 still follows an undulating week to week plan with week’s 1 and 3 being more about total volume over the week using larger ROM lifts and high session volume loads to create a lot of muscular work. This is juxtaposed with weeks 2 and 4 which have a higher frequency in terms of over the week but represent a higher average intensity and lower volume. The use of more competition specific set ups also reduces the load this increases the overall intensity of the weeks.
The overall trend of the block you will see is more of a linear pattern in terms of total lifts over the block you will see a steep decrease from week 1-4 which looks incredibly similar to what people think of when you mention a linear model or linear programme. However, you will see that intensity still follows a flip-flopping or non-linear path. This will help you to achieve two things over the block
1 – The decrease in total lifts or volume from week 1 – 4 will allow you to reduce fatigue noticeably to the point where you should feel pretty strong in week 4. This will be in essence a mini peak.
2 – The flip flopping nature in intensity should still allow you to maintain a more or less fatigued or “trained” state through the block which will allow you to not reach an actual peak which will make it easier to transition to another volume based training block.
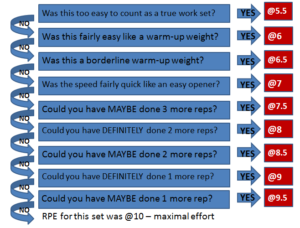
We are also introducing the concept of rate of perceived exertion or RPE which has really been popularised by Mike Tuscherer of Reactive Training Systems. The RPE is a great tool and one that has been latched onto by every “coach” or “trainer” who has a £9000 degree and 90p squat. It get’s plastered into everyone’s training with little to no thought behind it’s implementation and it is a very useful tool and can be quite a powerful way of making progress it also brings in open variables which in training can be a fucking nightmare if they aren’t applied correctly or planned for in the training cycle.
RPE Chart is taken from www.powerliftingtowin.com
Above you can see how RPE a scale of 1-10 is used in the context of how hard a working set is, you can refer to this on week’s 2 & 4 of the programme. It might take a bit of effort to hone in what these numbers mean or actually feel like but with some practice, they are really reliable and have been shown to correlate well with objective markers such as bar speed.
There isn’t a massive difference between the use of RPE or percentages in a practical sense if the measure of maximum is accurate however when you get 8-12 weeks into a training cycle assuming the training is correctly structured and going well then the introduction of some open ended variables like RPEs or AMRAPs can help to assert where you are without having to do a 1 Rep max in training. I personally prefer the RPE based heavier sets as they induce less overall fatigue to the lifter and are also far more specific to the demands of a 1 RM or powerlifting as a sport.
The Goals of this Block Are –
- Introduce weeks of high mechanical stress and low variation – by using lift variations that have a higher range of motion (close grip bench press vs competition bench press) we can still get a high volume/hypertrophy kind of stimulus from the training but induce less of an intensity or neurological/skill learning component to the week. This is important in blocks where we are looking to induce a higher intensity of closer to 100% effort since the higher specific nature or more neurally demanded nature of the week means there will be high levels of fatigue in the following days and week from the sessions. Juxtaposing this with lower intensity weeks with a higher total volume means it allows us to still stress the lifter but provide a “down week” or recuperation week from the higher intensities of week 2 & 4.
- Introduce open variable training and lifting closer to your capacity in the sessions – with the introduction of RPE (previously discussed) we allow the lifter to push the boat out a bit more and discover where their current fitness or 1RM lies in the form of heavy 4 reps sets in week 2 and heavy 3 rep sets in week 4. This should give the lifter or coach a better appreciation of where their maximum levels lie without the need to peak or enter into a testing environment where training is compromised before and after the testing period.
- Provide a small drop in fatigue over the block to produce a small peak and create a small drop in overall fitness – the goal of the block is to produce some gains in 3-4RM strength in competition or focus lifts this should provide some personal best performances with the drop in overall fatigue should allow the lifter to produce these results and the drop in fatigue will allow the body some respite from the volume based overload. This, however, will produce a net loss in fitness over the next 4 weeks which will need to be accounted for in week 1-2 of the next training cycle.
Where is the overload coming from in this block?
- Frequency (small overload) – The introduction of 3x per week exercise selection on weeks 1 & 3 should help to produce some hypertrophy or volume based overload during the block.
- Intensity (moderate overload / block vehicle for overload) – although in the grand scheme of things this block still represents a moderate-high level of intensity the open-ended nature of sets and the higher average intensities will represent the main overload stimulus in the block.
- Volume (no overload) – the volumes in this block should actual act as a deload compared to the last two blocks. This as previously discussed will lead to a drop in fitness which is intentional.
- Variance – There is actually a reasonable amount of variation from week to week in this block given the complete change in exercise selection and addition of extra session between weeks 1&3 and weeks 2&4.
Session Lay out (volume weeks)
Monday (Day 1) –
High volume Day.
Exercise 1 – High Bar Squat
Exercise 2 – Close Grip Bench Press
Exercise 3 – Deficit Deadlift
Assistance
Shoulders, Back and Trunk.
Tuesday – Off
Wednesday (Day 2) –
Easier Volume Day
Exercise 1 – Front Squat
Exercise 2 – Feet up bench press
Exercise 3 – Deficit Deadlift
Assistance
Chest, Upperback and Arms
Thursday (Day Off)
Friday (Day 3) –
High volume Day.
Exercise 1 – High Bar Squat
Exercise 2 – Close Grip Bench Press
Exercise 3 – Deficit Deadlift
Assistance
Shoulders, Back and Trunk.
Weekend (Off)
Session Lay out (intensity weeks)
Monday (Day 1) –
Hard Squat and Bench Day.
Exercise 1 – Squat
Exercise 2 – Bench
Exercise 3 – Pause Squat
Assistance
Shoulders, Back and Trunk.
Tuesday (Day 2) –
Hard deadlift and bench volume
Exercise 1 – Close Grip Bench Press
Exercise 2 – Deadlift
Exercise 3 – Floor Press
Assistance
Chest, Upperback and Arms
Wednesday (Day Off)
Thursday (Day 3) –
Hard Squat and Bench Day.
Exercise 1 – Squat
Exercise 2 – Bench
Exercise 3 – Pause Squat
Assistance
Shoulders, Back and Trunk.
Friday (Day 4) –
Hard Deadlift Day.
Exercise 1 – Deadlift
Exercise 2 – Spotto Press
Exercise 3 – Pause Deadlift
Assistance
Chest, Upperback and Arms
Weekend (Off)
Week to Week layout of the block
February Block
| Week | 1 | 2 | 3 | 4 |
| Total Lifts | 265 | 198 | 248 | 168 |
| Average Intensity | 69% | 77% | 74% | 79% |
March Block
| Week | 1 | 2 | 3 | 4 |
| Total Lifts | 264 | 232 | 199 | 156 |
| Average Intensity | 65% | 76% | 69% | 81% |
As you can see comparing the volume of block 2 (February) vs block 3 (March) you can see this block actually starts with a net higher volume than block 1 but drops down to less over the back end of the block. This is what I was talking about earlier re: the more linear nature of the block. You will also see there is little difference in average intensities however this doesn’t account for the open-ended RPE based sets which will push this number up. Looking at the plan in this more global
Looking at the plan in this more global sesne (week to week) you can also see how unregulated open-ended training might be a bad thing as you can’t plan or adjust for it precisely you can only make educated guesses about how it will affect fatigue levels which IMO is a strong argument for these methods to be used sparingly and in a definite context.
Week 1 – intro block this represents the highest levels of volume in the programme with the lowest intensities this is a preparation block to build up some work capacity and to provide a bit of a deload from the intensity.
Week 2 – the first “overload” block based off 5×4 @ 80% of maximum which gives an intensity by number of lifts of 1 which is a good stimulus and not too intense, spread over 2 sessions this on it’s own will give a good strength stimulus. The addition of open-ended sets based off RPE allows the lifter to apply more stress based off intensity and to also get a better idea of where they are at.
Week 3 – is similar to week 1 but with less total volume and a higher average intensity.
Week 4 – is again similar to week 2 however it uses a higher intensity for it’s planned loads 5×3 @ 85% which again provides an intensity by number of lifts of 1. The decrease in total volume however in week 3 and 4 will allow the lifter display their strength better so this should result in some personal bests even if not achieved in week 2. This will allow the lifter to readjust numbers going forward into the next Mesocycle.
Get the programme
Get your copy here –


